
#Izenda FORMS
##14.1 Introduction To FORMS
Preface
Izenda FORMS is an add-on to Izenda REPORTS, Izenda’s core reporting and business intelligence platform. Izenda connects directly to relational and non-relational data sources. Through its .NET API, it loosely couples with Microsoft-based applications to integrate with the current security, branding, and navigation of your .NET applications.
###About FORMS
Izenda FORMS allows the user to input HTML5 into a browser-based HTML designer and then use that code to build an Izenda form report. Izenda’s point-and-click interface is designed for the standard business user, with advanced options available for those with greater access and skill. Izenda FORMS is one of these advanced options.
FORMS Design NOTE1: Though a basic user can easily make changes to existing forms, designing new forms does require a user who is comfortable with HTML5. Many users will never design FORMS, but simply make modifications to current core FORMS.
FORMS Design NOTE2: Izenda FORMS will override the normal reporting behavior within Izenda when a FORM is attached to a report; the FORM is what the engine renders. To use a standard Izenda report in tandem with a FORM, you must call the report into the HTML FORM itself.
With Izenda FORMS, you can:
-
Create WYSIWYG forms using HTML.
-
Import existing HTML forms and push data from your database into specific form locations.
-
Utilize our high quality HTML->PDF rendering engine.
-
Create, and easily customize, pixel perfect, printer-friendly, dynamic web forms to deliver to your end users.
-
Create Master Detail Reports.
-
Embed Sub-Reports and use smart tags.
-
Employ flexible filters and high performance repeaters.
-
Customize the product through our rich API.
###Introduction to using the Forms Tool
This section of the user manual will walk you through the basic usage of the Izenda FORMS tool. Any data that your application developer has included in the database can be accessible to you in creating ad hoc forms.
A form is an HTML document which you populate with data from a database. As an example, let’s think of a form letter sent to every customer. The letter has fixed copy, but also dynamic portions such as recipient name, address, etc. If you have a database which contains those dynamic elements, then you can insert them directly into the fixed portion in order to produce publishable output.
FORMS Design NOTE3: The default behavior of forms is to generate one entry per ‘row’ of data until all rows are generated or the user-defined limit is reached.
##14.2 Basic FORMS Reports
###Starting a Forms Report
To create a form-based report using Izenda FORMS, simply click ‘Design Report’ as you would to create any report using Izenda. Once you are in the ‘Data Sources’ tab, choose the relevant data sources.
Continue to the ‘Fields’ tab. Choose any relevant fields. You can use the ‘Format’ drop-down menu to execute data formats within the form you create. Izenda FORMS will allow you to choose fields to call into the form from any available inside the selected data-source without actually choosing them in the ‘Fields’ tab; when the form and report are saved and reloaded, FORMS will automatically populate the ‘Fields’ tab with the fields called in the form.
FORMS will recognize aliases changed in the ‘Fields’ tab under ‘Description.’ For instance, a field named ‘OrderID’ and aliased as ‘Order#’ in the ‘Description’ column would be called within Izenda FORMS as [Order#]. Using the ‘Advanced’ button for each field, expressions or concatenations can be implemented into the fields called by FORMS.
Examples:
[dbo].[Employees].[Address] + ', ' + [dbo].[Employees].[City] =>
111 Grand Ave, Atlanta
[Quantity] * [Price] => 5 * 10.50 => $52.50
After choosing relevant fields and adjusting formats in the ‘Fields’ tab, click ‘Design Form’ at the bottom of the ‘Fields’ list.
Building Reports
The form designer has two modes: ‘Editor’ and ‘Source.’ Izenda’s form designer functions in the same manner as any browser based text editor when in ‘Editor’ mode. In this interface you can see a preview of rendered HTML and any user can make a quick customization or change. Changes made in ‘Editor’ mode are automatically parsed into HTML.
###Source View
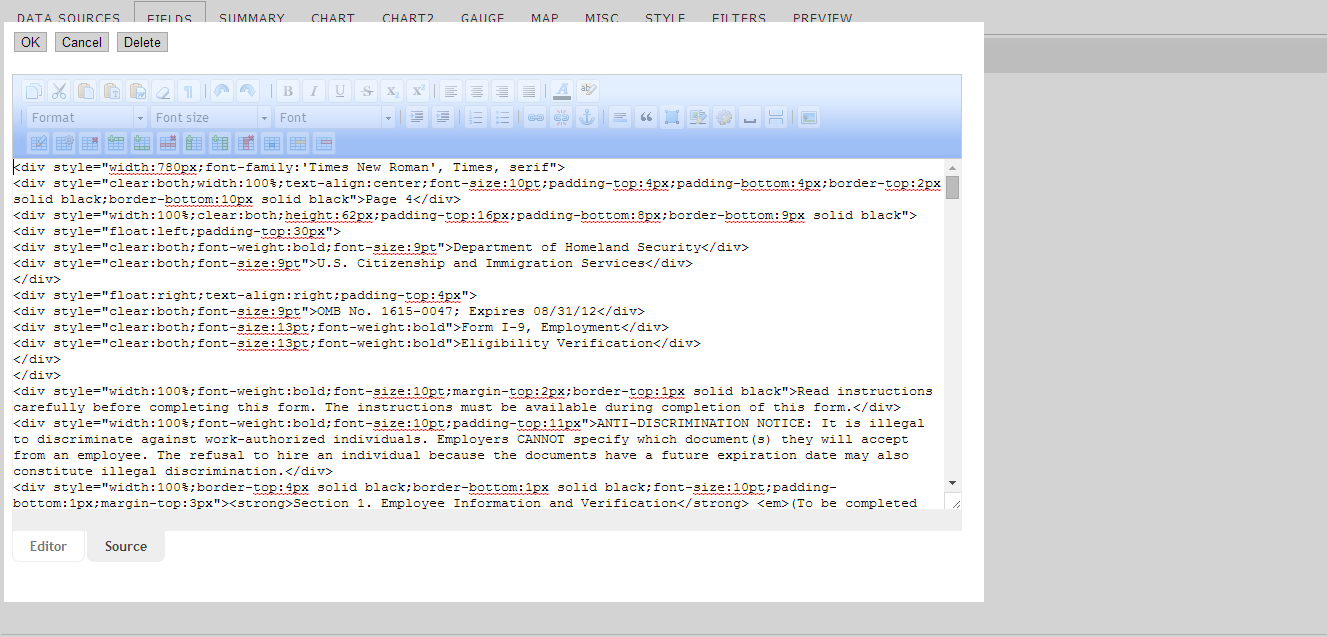
Source mode accepts HTML directly. If you are designing a new form from scratch, most HTML designers will find it is best to build new projects using a web design tool like Expressions and then simply paste the source code into Izenda FORMS in Source mode. The user should not attempt to build a complex report using Editor mode, because the parsing engine will add additional unnecessary complexity as the report complexity increases, and any HTML added into Editor mode will display as text rather than as the markup that it actually was meant to be.
###Editor View
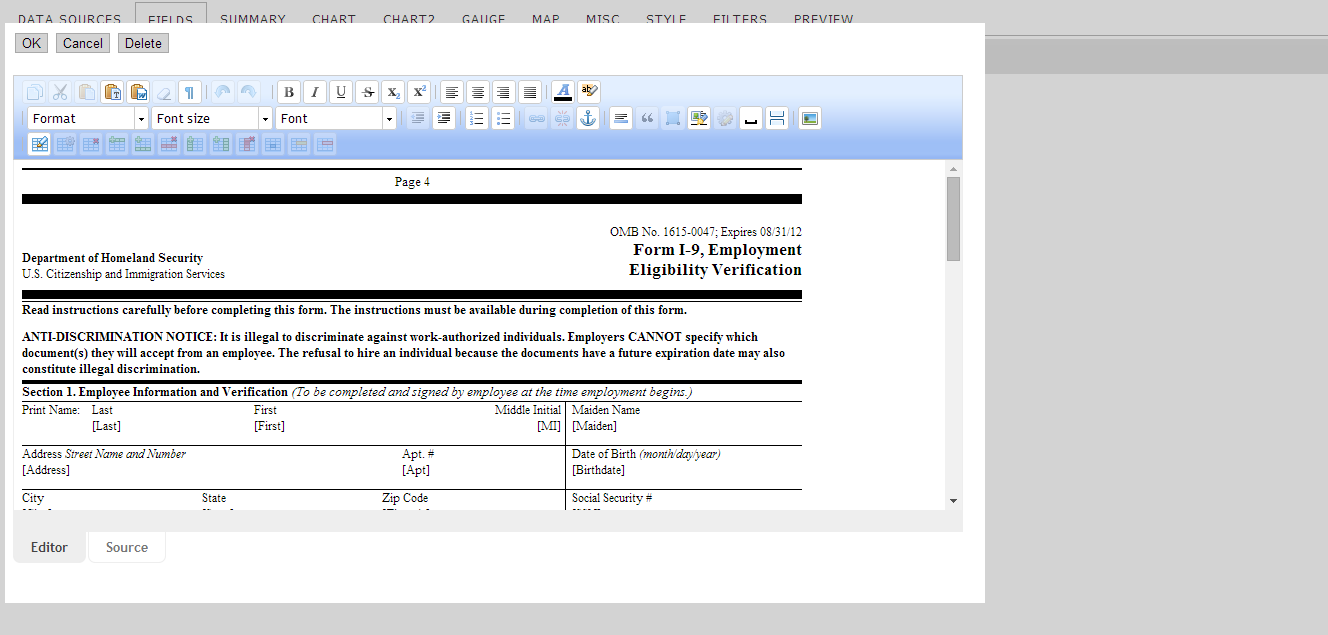
Editor mode allows you to insert text only. Any markup that is entered here will be translated into a form that will not be interpreted by the browser. You can see this if you paste HTML into the Editor mode box and then click Source. However, if you are editing in Source mode and click the Editor mode button, you will see that the HTML is parsed into what will be displayed in your report. The I9 form above is generated in such a way.
Again, it is best practice to build an Izenda FORMS report in Source mode by hand or by using an external web design tool to generate HTML. Once this HTML is pasted into the tool while in Source mode, you can easily switch to Editor mode to fine-tune the output.
Video Tutorial: http://blog.izenda.com/quick-tutorial-making-the-most-of-your-toolbar-options/
Adding Fields
Fields are inserted into a form using square brackets. The name within the square brackets should correspond to either the actual name of the field or the alias you gave the field. Either one will work, although there are times when you should use one over the other, as we will describe below.
Example:
If you want to display the field 'ShipCountry', then at the appropriate place in the form, you would place the [ShipCountry] tag. You could also place [Ship Country] in your form if you aliased the [ShipCountry] as such. The alias is the exact text in the "Description" text box on the Fields tab.
Video Tutorial: http://blog.izenda.com/quick-tip-adding-and-modifying-fields/
##14.3 Advanced FORMS Concepts
Nesting Reports and Forms
As described earlier, we can specify fields by using either one or two square brackets. We covered the single square bracket above. Now we will cover a double square bracket. By using double square brackets, you can call another form or report. If you have a form called City Data in the Subreports folder, you would type [[Subreports/City Data]] into your form to embed that form into your report. This works regardless of whether the embedded report is a form or a non-form report.
Caution is recommended when designing nested sub-reports and forms. When you call a report from inside of a master report, you are essentially using a query to run another query (and by extension, all queries that might be contained within that nested query). It is thus possible to build a chain of nested reports that can cause severe performance issues.
The flexibility of nesting reports and forms is most desirable for many small cases, in which sub-reports only exhibit a very small performance hit. Complex or multi-level nested reports may experience significant performance issues; in these cases it is best to find a way to achieve your goal without using sub-reports.
Repeater Tag
If you have content that you want to repeat within a form, you don’t need to use a nested sub-form. By enclosing this content with the [repeater] tag, the forms engine will repeat that content until it is exhausted.
In this example, we would create a report with 1+n rows. The first row is static and displays text in two cells with the text "Person" and "Certs". The second row is within a repeater, which means that it will generate n times where n is the number of valid [PersonID] entries. This repeater has a nested repeater in the second cell, which will populate all valid [Name] for each [PersonID].
<table>
  <tr>
    <td>Person</td>
    <td>Certs</td>
  </tr>
[repeater]
  <tr>
    <td>[PersonID]</td>
    <td>[repeater][Name], [/repeater]</td>
  </tr>
[/repeater]
</table>
All of these count against the Records display limit. If you have four [PersonID] records and each [PersonID] has three [Name] entries, then the form would count as 12 records. This means that if you set it to only display 10 records, the form would not display completely.
Limitations: You can only nest one set of repeaters at a time. This is a correct use:
[repeater]

    [repeater]

        [repeater]

        [/repeater]

    [/repeater]

[/repeater]
And this is an incorrect use:
[repeater]

    [repeater]

    [/repeater]

    [repeater]

    [/repeater]

[/repeater]
##Tutorial
We will go over a fairly complex FORMs report using the concepts described above. We also have a couple of Video tutorials
- http://blog.izenda.com/quick-tutorial-how-to-use-the-repeater-tag/
- http://screencast.com/t/6RwYd7sKKKh (alternate)
- http://blog.izenda.com/quick-tutorial-making-the-most-of-your-toolbar-options/